MADHDA Business Solutions
  • Home
  • About Us
    • Privacy Policy
  • Services
    • Implementations
    • Support
    • Training
    • Upgrade
    • Business Analysis
  • Solutions
    • MS Dynamics 365 Business Central
    • MS Dynamics Nav
    • MS Dynamics 365 Sales/CRM
    • Power BI
    • Power Automation
  • Resources
    • Blog
  • Contact Us
  • How to Print Trans Header and Trans Footer in RDL Report in Business Central 365.

How to Print Trans Header and Trans Footer in RDL Report in Business Central 365.

10 January 2023

How to Print Trans Header and Trans Footer in RDL Report in Business Central 365.

Hello Readers,


As mentioned in the heading today we will discuss below about Trans Header and Trans Footer. In which we need to print  Carry Forwarded Amount at the Top of page and at the Bottom we used to display carry forwarded amount + Current Page amount Total.

We can achieve this functionality by these below functions.

  • RunningValue function
  • ReportItems function


RunningValue: Returns a running aggregate of all non-null numeric values specified by the expression, evaluated for the given scope in a paginated report.

  • syntax:RunningValue (Expression, Function, Scope)
  • Parameters:
  1. Expression: The expression on which to perform the aggregation, for example, [Quantity].
  2. Function:  The name of the aggregate function to apply to the expression, for example, Sum. This function cannot be RunningValue
  3. Scope: A string constant that is the name of a dataset, data region, or group or null (Nothingin Visual Basic), that specifies the context in which to evaluate the aggregation. Nothing specifies the outermost context, usually the report dataset.


ReportItems: ReportItems item can be used to display or calculate data from another field in the report.

syntax: ReportItems!<TextboxName.Value>

Example : =ReportItems!Textbox1.Value


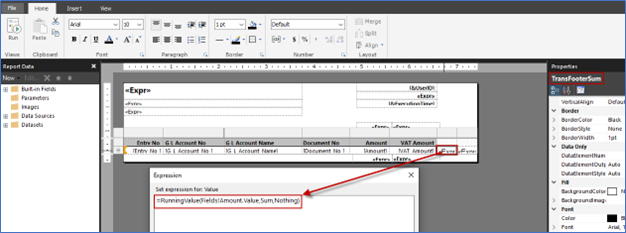
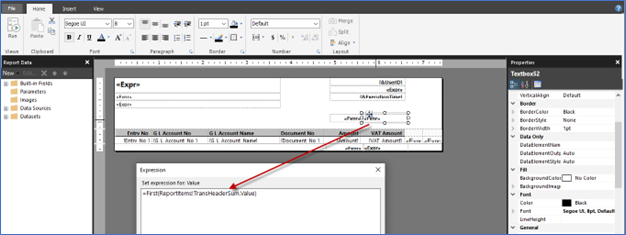
Let’s move to Microsoft Builder and Add one new Textbox for Footer part to Summed up the value. Add mentioned Expression and rename the Textbox Name by TransFooterSum.


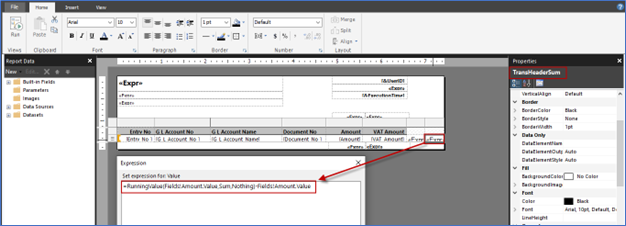
Now we need to add another Textbox for Header Part to Summed up the value. Add Expression in the textbox and rename as TransFooterSum.


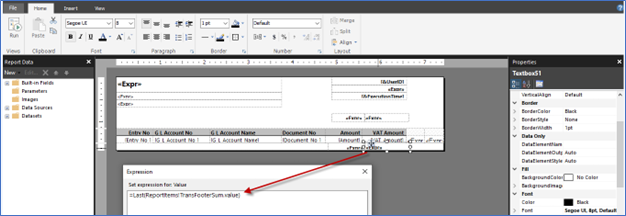
Now we will Add Two Textbox in Header Part and Two Textbox in Footer Part to display

  • For Header Part [Need to give Textbox Name in which we have summed up value for Header Part]

  • For Footer Part [Need to give Textbox Name in which we have summed up value for Footer Part]


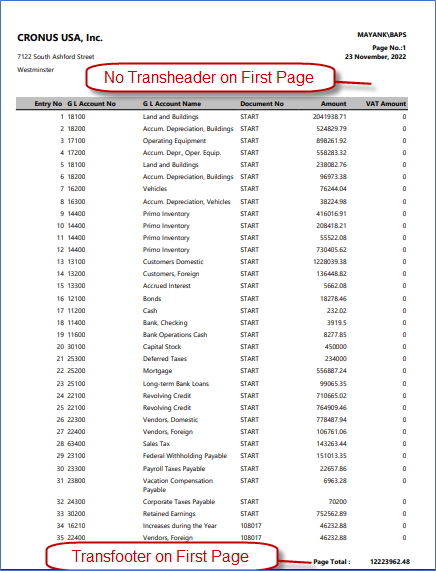
Now we will hide Trans Header Value on First Page and if you want Trans Footer Value on last page then use below expression in visibility.

Visibility Expression for Trans Header Textbox :

            =IIF(Globals!PageNumber=1,true,false)

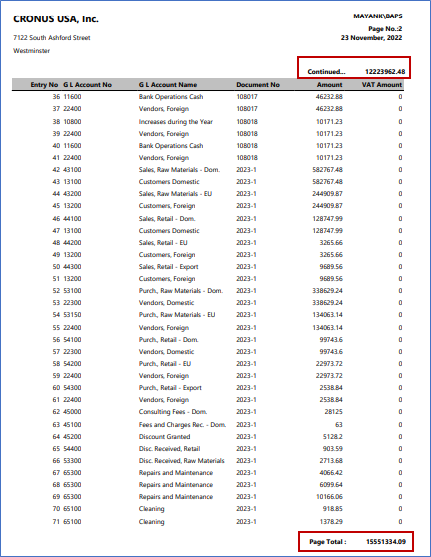
Visibility Expression for Trans Footer Textbox :                                                                                   =IIF(Globals!PageNumber=Globals!TotalPages,true,false)

Output First Page:


Output Second Page.


Hope you have understood pretty well about Trans Header and Trans footer.

Share your business Concerns with us on Contact@madhda.com!


Regards,

Madhda Team

Thanking you all.


Previous post: AL Performance Profiler.
Next post: ” Business Central : Convert Sales Quote to Sales order using Power Platform”

Categories

  • Microsoft Dynamics 365
  • Microsoft Dynamics Business central
  • Microsoft Dynamics NAV
  • Uncategorized

Recent Post

  • Uploading Files into Azure Storage from Business Central Document Attachment.
    January 23, 2023
  • " Business Central : Convert Sales Quote to Sales order using Power Platform"
    January 13, 2023
  • How to Print Trans Header and Trans Footer in RDL Report in Business Central 365.
    January 10, 2023
  • AL Performance Profiler.
    January 2, 2023
  • MAKING BUSINESS CENTRAL YOUR BUSINESS MANAGEMENT SOLUTION.
    December 6, 2022


    © Copyright 2020 | All Rights Reserved By MADHDA