 You-tube


This comprehensive guide is designed to help Finance Team to successfully set up, process, and distribute Vendor 1099s in Business Centra.
1. Introduction & Purpose
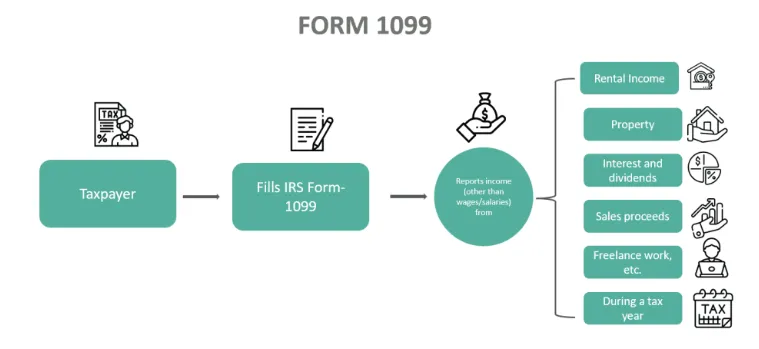
Form 1099 refers to the income tax form used by taxpayers to report their annual income to the Internal Revenue Service (IRS) received from any source, whether as a freelancer or anything besides their salary. It has to be done so as to help the IRS compare the incomes of taxpayers as recorded in their Form 1040. Thus, the IRS gets appropriate data to calculate, impose, and collect taxes from taxpayers.
Key Takeaway:
- On Form 1099, the Internal Revenue Service (IRS) requires taxpayers to declare all yearly income, including any earned outside their wage or as a freelancer or contractor.
- It must be completed to assist the IRS in comparing taxpayers’ reported incomes on forms 1040. IRS obtains the necessary information to determine, levy, and raise revenue through taxpayers.
- It has six main types – 1099-MISC form, 1099-INT form, 1099-DIV form, 1099-C form & 1099-R form. Only employers having freelancers or independent contractors have to submit the form to the IRS.
- It reports only miscellaneous income, but Form 1040 reports salaried income.
Form 1099 gets issued by firms and businesses to their freelancers and hired contractors, summarizing their annual earnings other than salary. It includes the details of freelance work compensation, bank interest earned, and investment dividends. These have to be provided to the tax-filing workers within the first week of February by the firms, businesses, or individuals. It can be provided to the tax filers via email, electronically, or hardcopy.
More importantly, one does not have to submit it to the IRS but has to keep it for tax records to be used during an audit of accounts. One copy is sent to the IRS and one to the service or goods providers. Therefore, if the tax filers do not mention these incomes on their Form 1040, their income tax return could be flagged, calling for audit.
Keep in mind that invoices that have 1099 codes and amounts must have been paid in the calendar year of the 1099 to be included in reporting to the IRS.
Who Must File?
Not everyone has to file a 1099, but only those with the following conditions:
- A person who hires an independent contractor or freelance.
- The person had paid a minimum of $10 as royalty or brokerage in place of tax-exempt interest or dividends.
- Paid a minimum of $600 for – rent, prizes and awards, other income payments, health care, and medical payments, proceeds of crop insurance, payments made to a lawyer, payments in cash received from individuals engaged in fishing or aquatic life for buying their fish and related meat, the money transferred out of a contract with a hypothetical principle to a person, business, or estate,
Besides all these, even if one has made direct sales of five thousand dollars or more of consumer goods to the buyer as reselling anywhere outside the permanently incorporated retail business establishment.
Business Central provides tools to simplify IRS 1099 reporting, including electronic filing and vendor distributions. This document ensures correct setup and smooth year-end reporting.
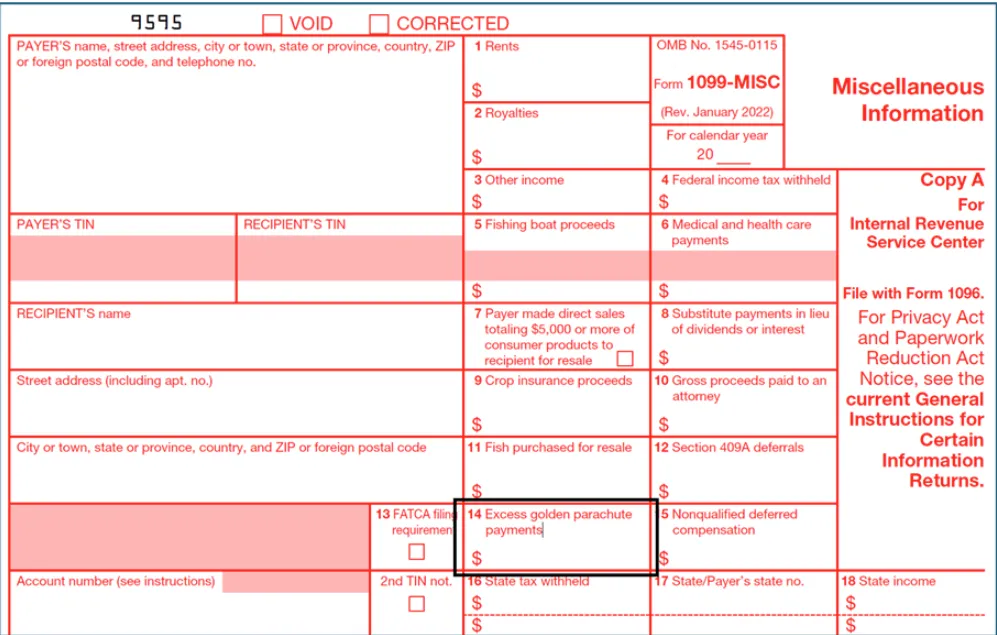
Sample for 1099.
2. Annual Preparation & System Readiness
- Setup and Maintenance should be done each year. Perform setup after completing the prior year’s reporting.
- We can ‘back fill’ data in vendor ledger entries for the previous year, We can enter corrections such as the amounts processed in a legacy software prior to migrating to Business Central and we should validate data.
3. Enable the 1099 Feature
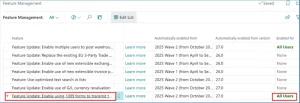
- Go to Feature Management.
- Enable ‘Use 1099 forms to transmit tax data to IRS in the ‘US’.
- Set for ‘All Users’ and restart session.
- This activates modernized forms and e-submission capability.
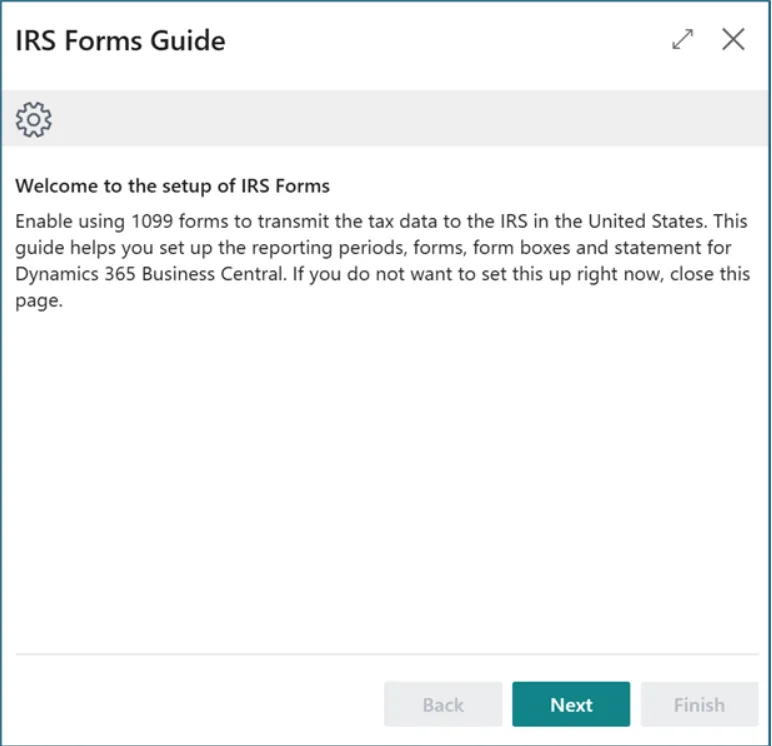
- Automatically put into the IRS Forms Guide Wizard:
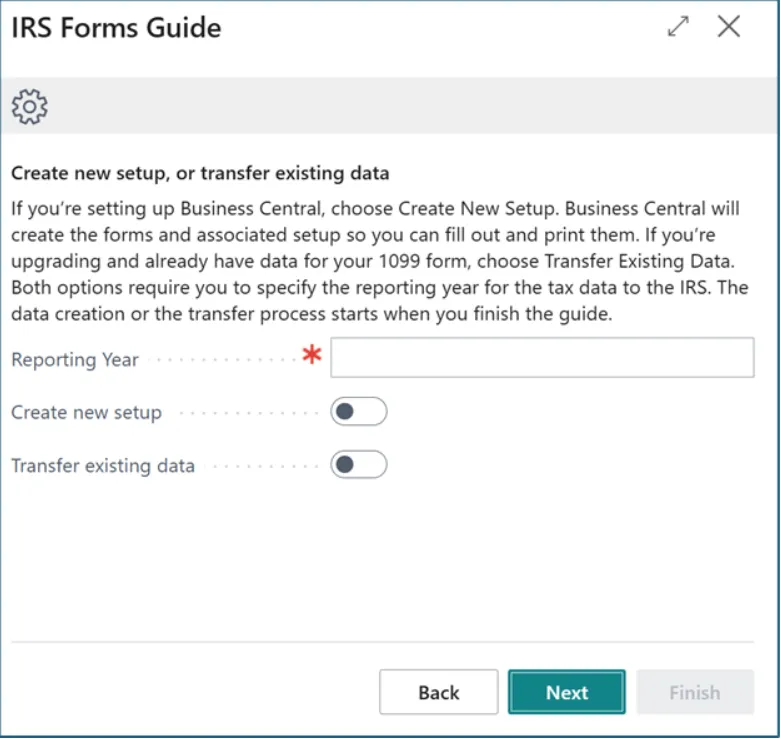
- Enter the reporting year (e.g., in January 2025, enter 2024 to process 2024 forms).
- Choose Create New Setup (not Transfer Existing Data), as this option creates the 1099 forms and form boxes correctly.
- After setup, use the Propagate feature to update existing vendor transactions.
Note: If we’ve never used 1099s in Business Central, choose Create New Setup otherwise choose Transfer Existing Data.
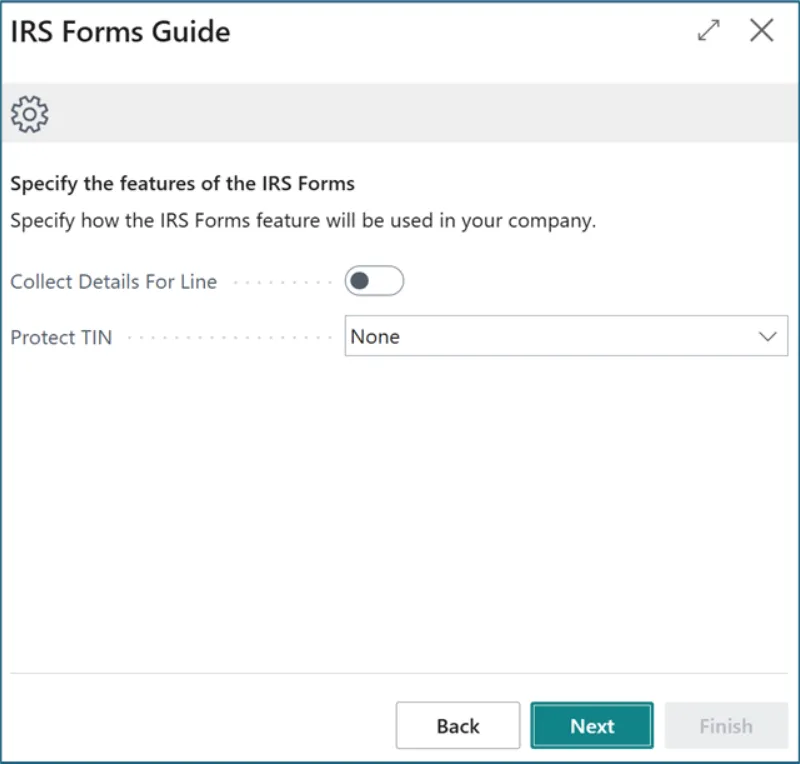
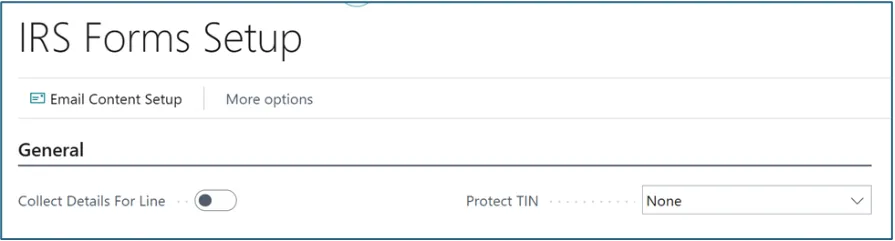
Collect Details for Lines : Should be false as this will take more database space.
Project TIN: The Protect TIN will mask the vendor and/or company TIN numbers when printing. This is to your preference
Manual Setup for Collect Details for Lines:
We can change the Collect Details for Line and Protect TIN on the IRS Forms Setup page. Additionally, you can view and/or modify the Email Subject and Email Body that will be generated when sending 1099s from the IRS Forms Setup.
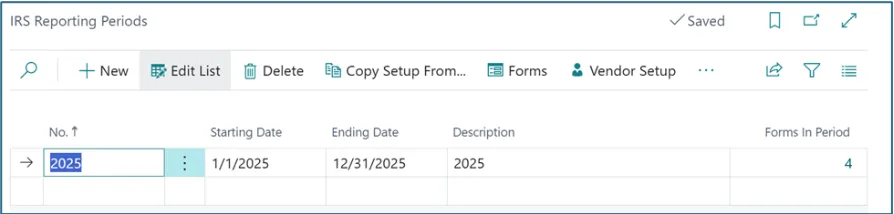
4. Create IRS Reporting Periods
- Search ‘IRS Reporting Periods’.
- Create new period (enter Start Date, End Date, Description).
- Use ‘Copy Setup From…’ to replicate prior year setup.
5. Update 1099 Form Boxes
The system creates the1099 forms by Type of DIV, INT, MISC, NEC, etc. If you have any specific ones, you can create more.
- Navigate to ‘1099 Form’.
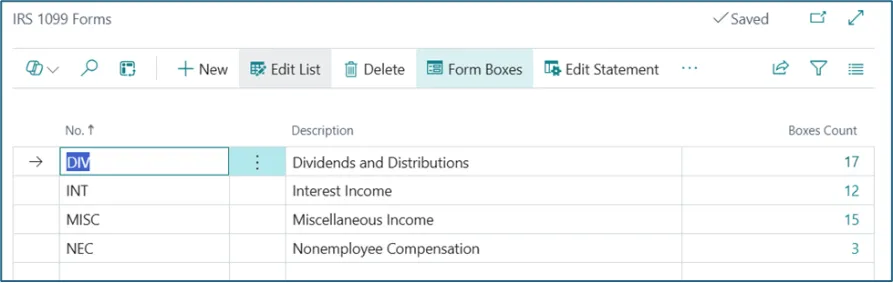
Attached to each type of 1099 are the specific 1099 Forms. They are called Form Boxes but are not really the ‘boxes’ on the form. This is where the minimum reportable amounts are defined.
In the US, we think of the 1099 Form Boxes as the 1099 Forms. This is a bit confusing. And seems redundant to have the 1099 Form Code and the 1099 Form Boxes but it works.
- Click on ‘Box Count‘ which will open ‘IRS 1099 Form Boxes’ to refresh definitions for the new reporting year.
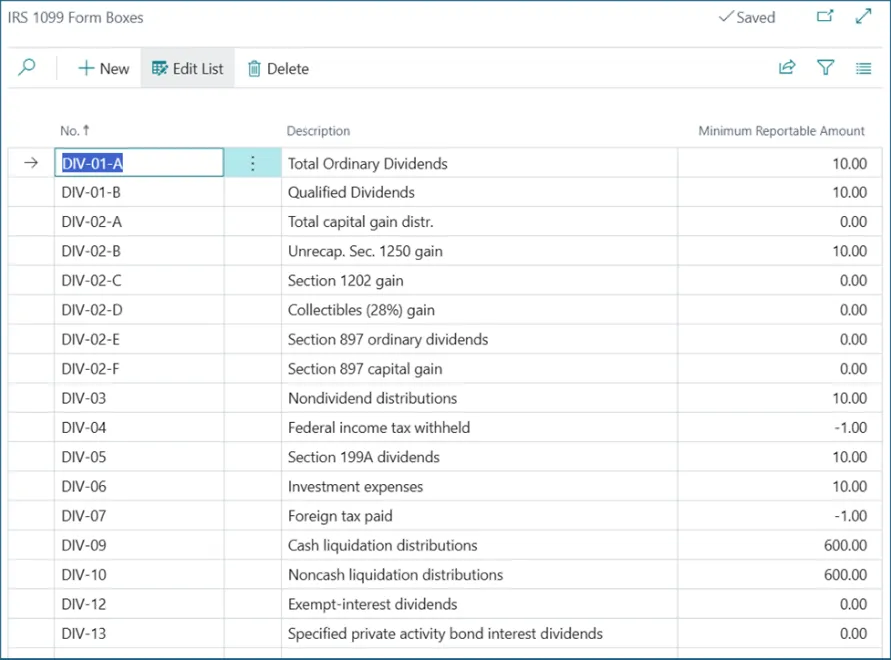
- This step is critical as box definitions often change annually.
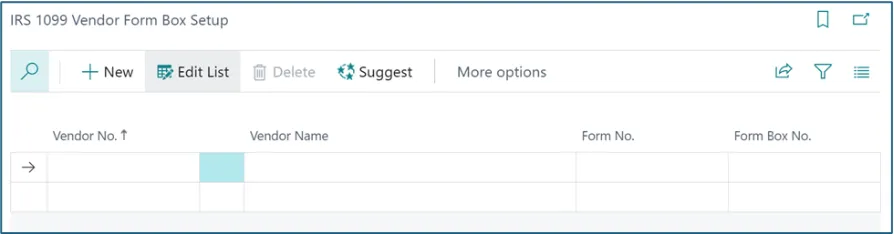
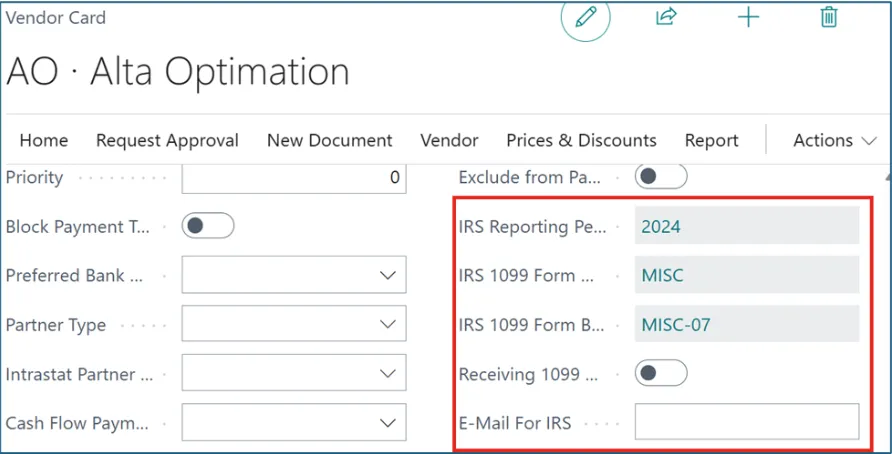
6. Configure Vendor Defaults
On the IRS Reporting Periods page, run the Vendor Setup. You can use the page to add the vendor that needs 1099s.
You can input the vendor data into the Vendor Setup screen.
Vendor No, Form No. and Form Box No. are the required fields. Once added, you can see that the vendor card is updated.
If you already have vendors setup with 1099 codes, us the Suggest option and filter for vendors with 1099 codes. This will populate the above IRS 1099 Vendor Form Box Setup data.
Notes:
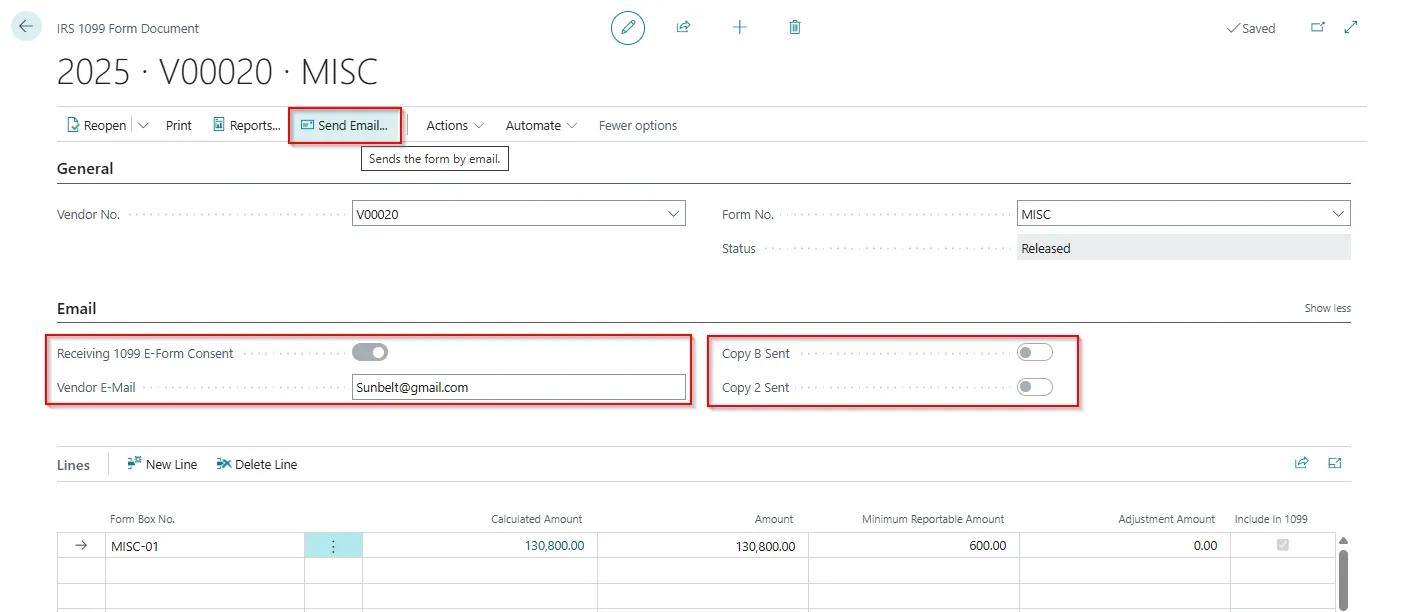
On the Vendor Card, you also need to populate the Federal ID Number. If the vendor wants to receive 1099 by email, toggle to the ‘on’ position the ‘Receiving 1099’ field shown above and enter an E-mail for the 1099.
Also, make sure that your Company Information is up to date so that your company name, address and Federal ID number are accurate
7. Propagate
Did we not populate the 1099 Codes on your vendors for last year and we paid the vendor? Never fear, BC to the rescue!
We can set the vendor information here and then use the Propagate feature to update fields in the vendor ledger and/or purchase documents. This is a great tool for updating vendor transactions after they are posted.
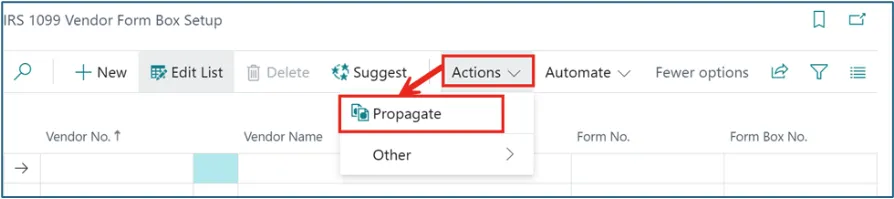
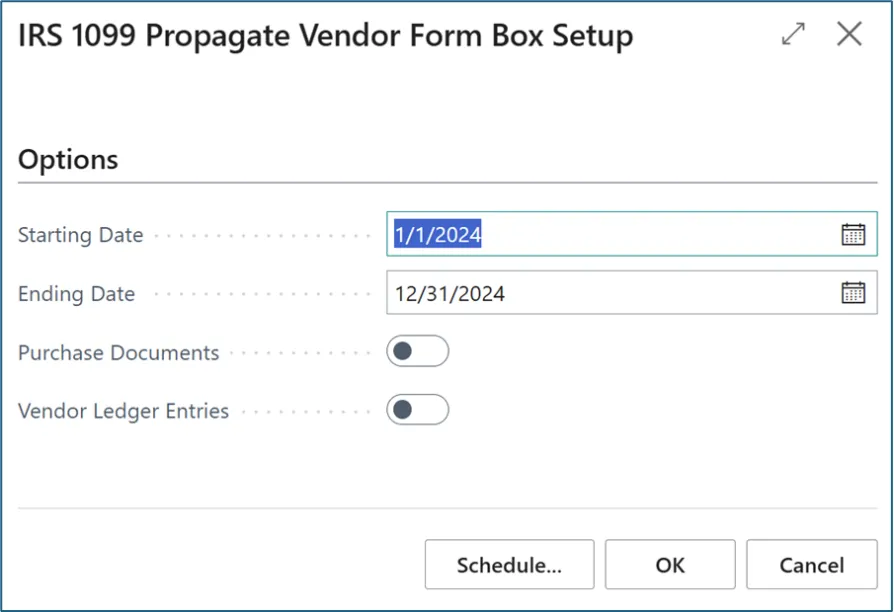
Once we define the vendor’s 1099 form and box, this tool will update transactional data during the date range provided as selected for purchase documents and/or ledger entries.
There is one downside to the propagate feature. If We had a vendor invoice that was NOT 100% IRS 1099 liable, the propagate will overwrite the 1099 amount with the total of the invoice. Therefore, it would be smart to export all your vendor ledger entries with 1099 codes and amounts before implementing the new 1099 feature.
8. Processing Transactions
When entering vendor invoices, the IRS 1099 Code auto-fills.
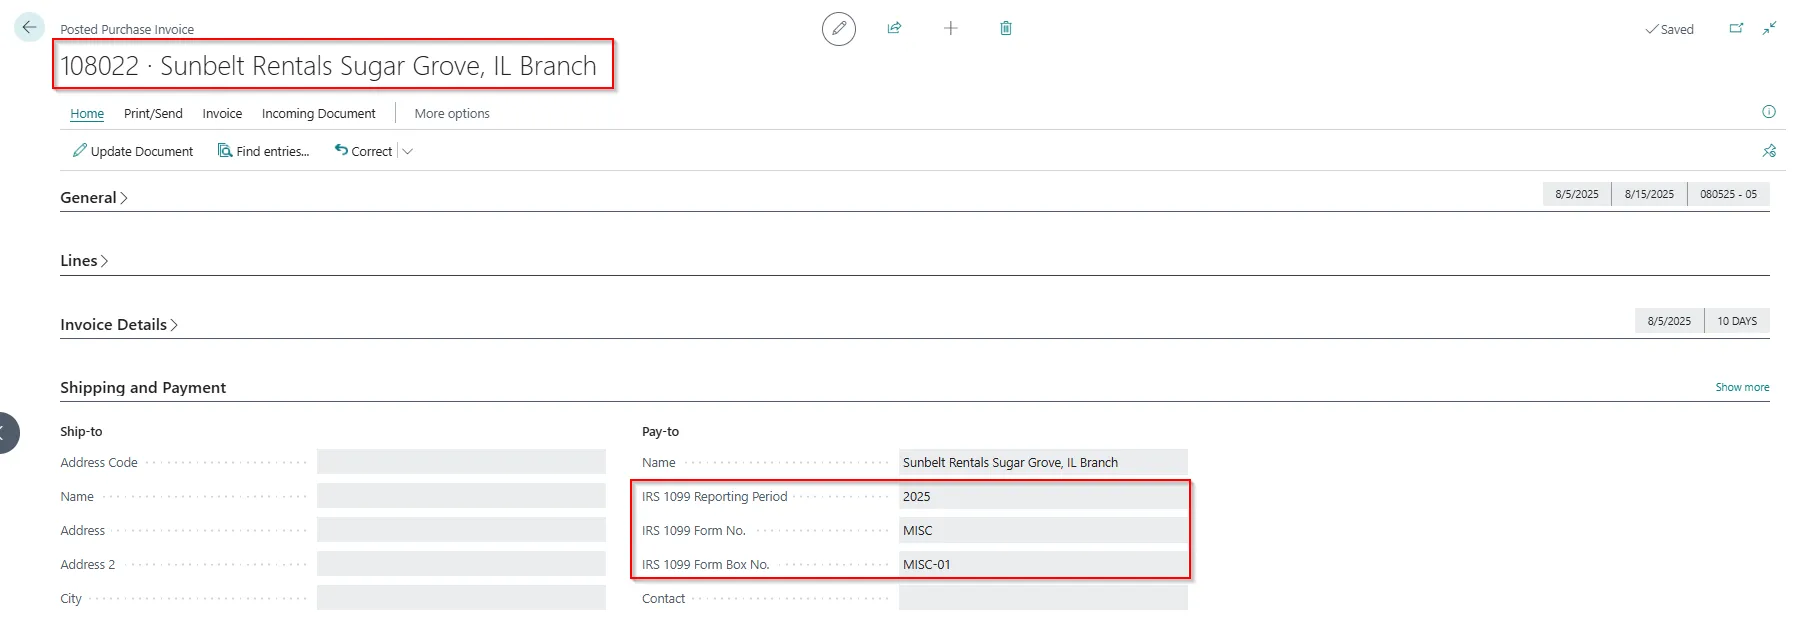
We can override IRS 1099 Code at invoice line level.

Posted Vendor Ledger Entries automatically reflect IRS 1099 liability.

9. Validate & Adjust Entries
Corrections to vendor 1099 amounts can be made within the Vendor ledger entries. Here, adjustment can be made only if Form is not created for this vendor for relevant period.
When processing IRS 1099 forms, we often find adjustments to 1099 amounts are required.
Transaction level adjustments may be required because:
- A portion of the invoice is not a 1099 event (i.e. reimbursable expense.)
- Transactions were processed before the 1099 information was set on the vendor card.
- Transactions are coded to the wrong IRS 1099 Code or a vendor may be subject to multiple 1099 forms types.
To correct, Access Vendor Ledger Entries → Edit List → Adjust 1099 Codes or amounts.
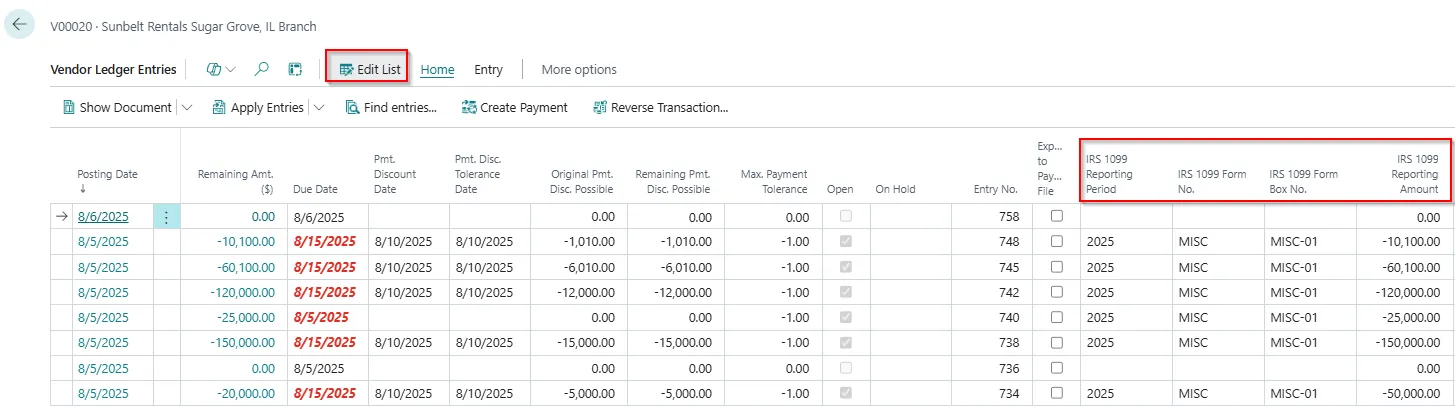
Once we are finished correcting the transactions We can run the “Vendor 1099 Information” report to verify the totals.
This is also great for those implementations that happen during the year rather than at January 1st. We can load 1099 information from legacy systems so we can handle the full year’s activity in your 1099s.
10. Reports and Validation
Process 1099 Liable Transaction:
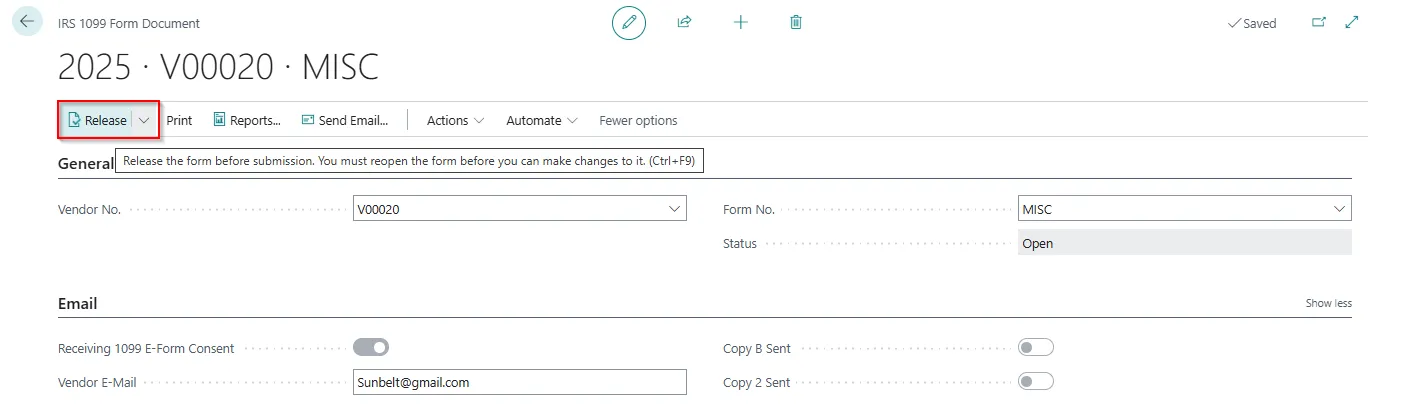
In Business Central, the 1099 Form Document is a structured record used to compile, manage, and report payments made to vendors that are subject to IRS 1099 reporting requirements. It plays a central role in generating accurate 1099 forms for submission to the IRS and distribution to vendors.
1. OpenIRS1099 Form Document page and click on “Create Forms”. Update the following values: Period, Vendor No. and Form No. Click on “OK”.

2. “Replace” Boolean is enabled in case there is already existing form document and User want to replace with new Form.
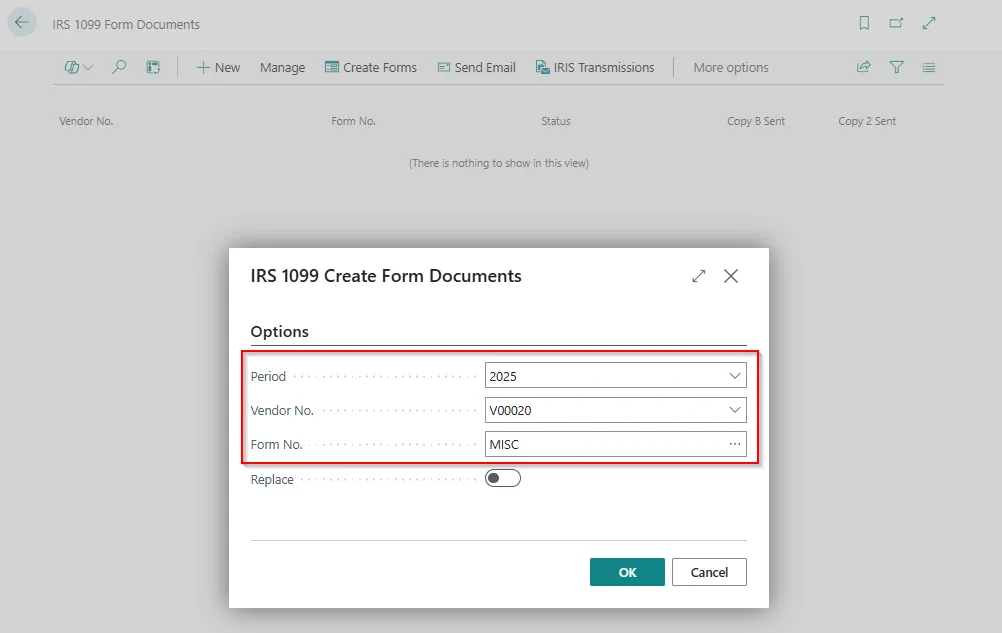
3. Open the Form Document.

IRS will be generated. Open the form and User can see the “Calculated Amount” field populated with the paid invoice amount. It is a flow field, and User can see the Invoice details associated with it.
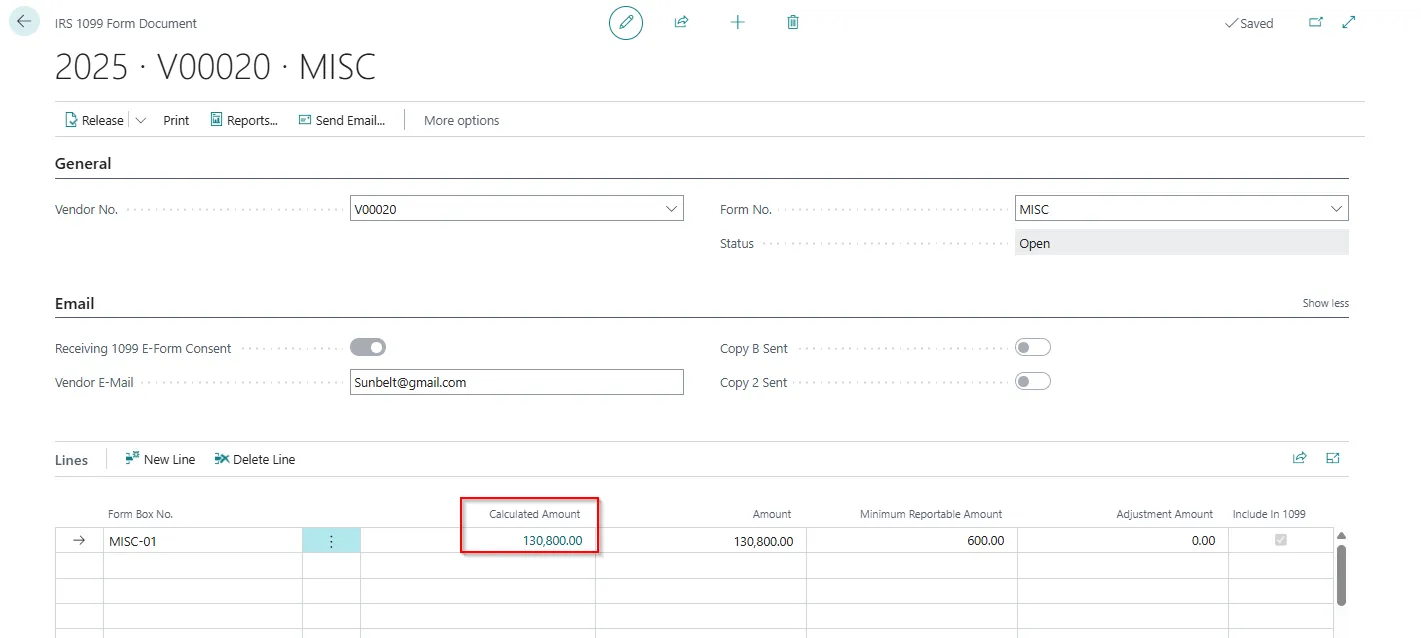

Note: After we create 1099 form documents for vendors, when we post invoices for vendors and apply payments to them, the Amount field on the 1099 Form Document page updates. It’s a good idea to review the amount before we submit the information.
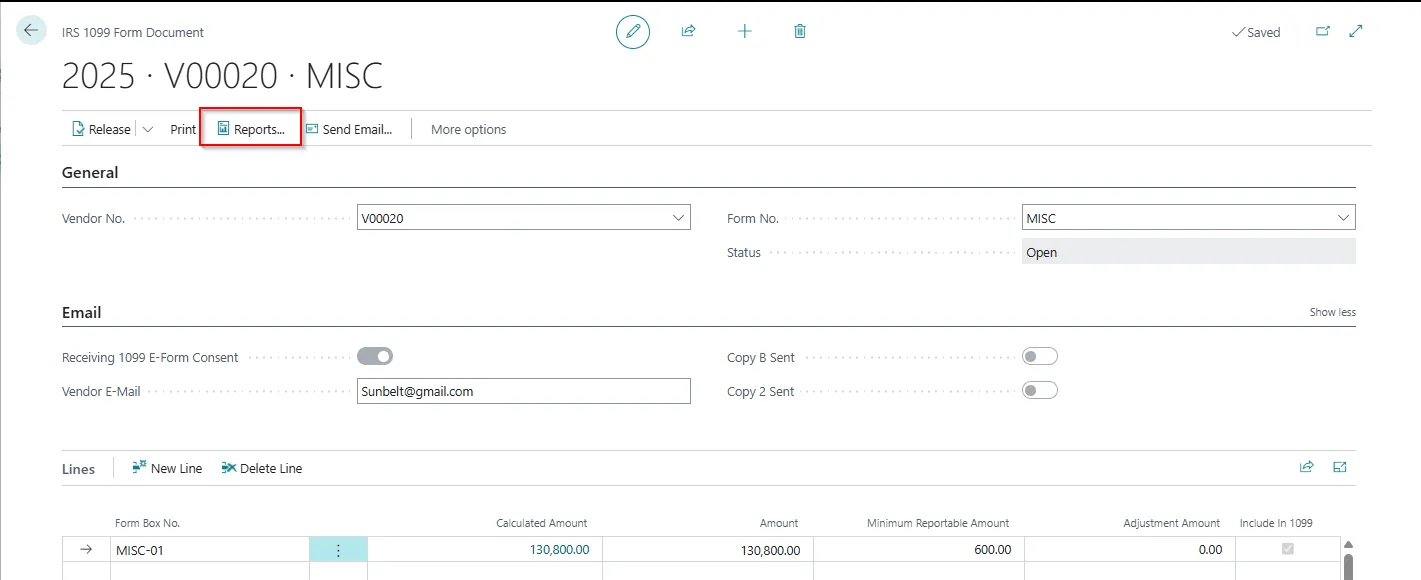
Before submitting, we would have a quick overview of the Form, and we have to go to “Reports” action and update the lines with dropdown as highlighted below:
4. Submit using integration with IRIS
Search for the ‘IRIS Transmissions’ in Global Search, and then choose the related link.
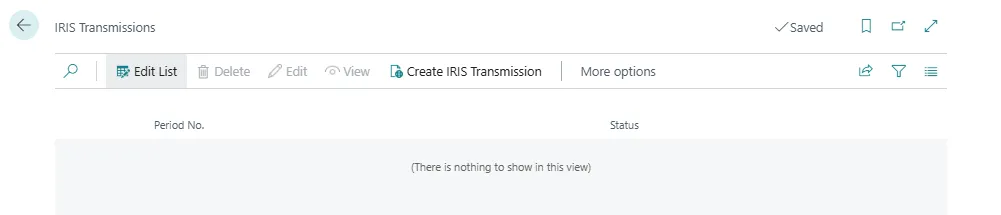
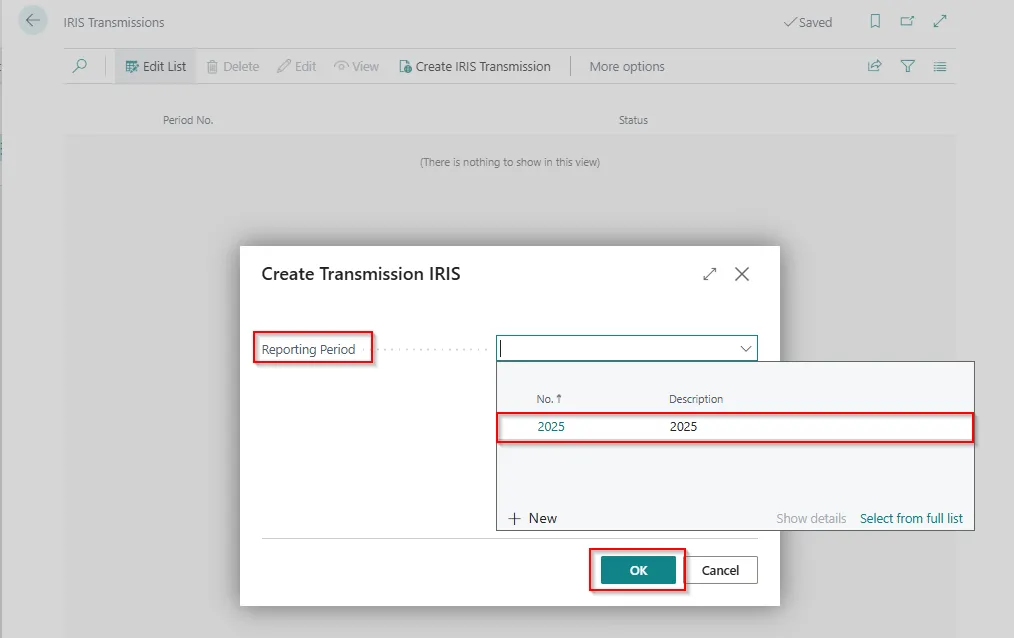
To combine all released 1099 documents so that we can send them to the IRS, on the IRIS Transmissions page, choose the Create IRIS Transmissions action.

5. On the Create Transmission IRIS page, fill in the Reporting Period field, and then choose OK.
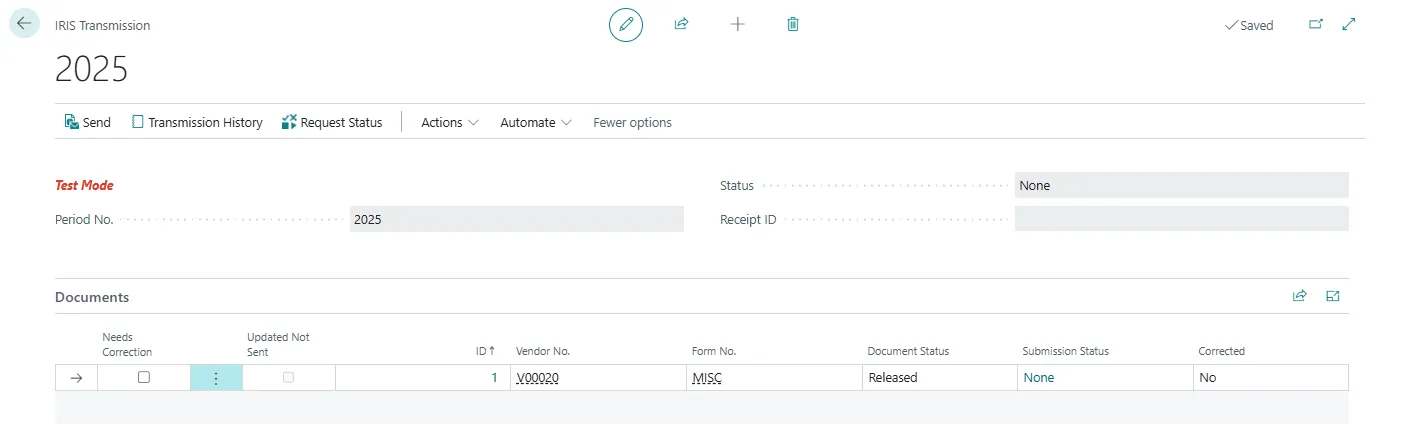
6. On the IRIS Transmissions page, choose the value in the Period No. field to open the IRIS Transmission page, where we can review the information before we submit it.
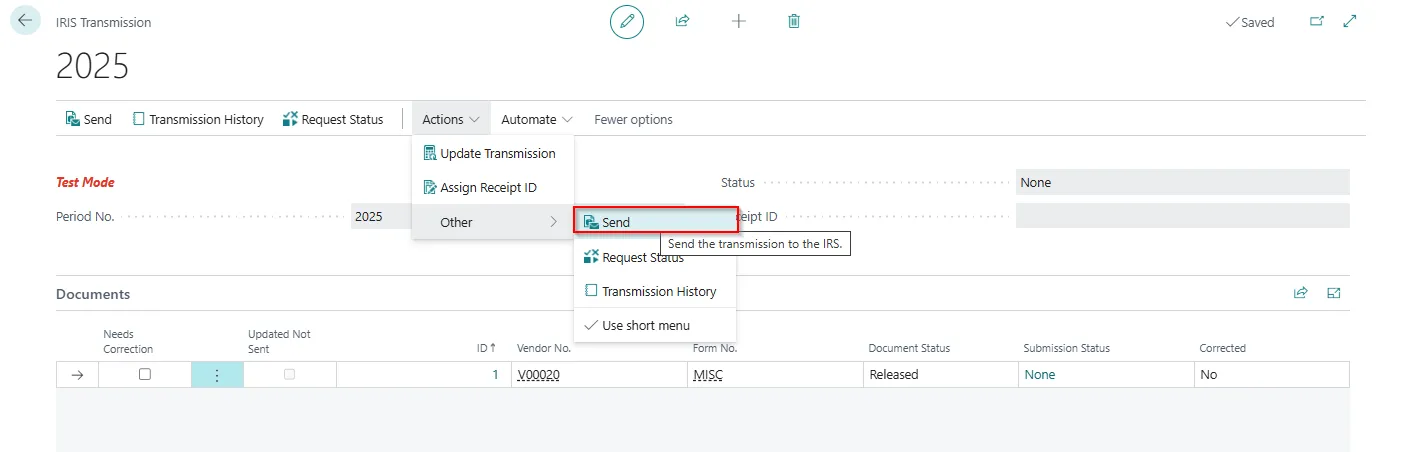
7. If the information is correct, choose the Send action.
After we submit the document to the IRS by using the API, the status of the document on the IRS 1099 Form Document page changes to Submitted.
When we send information to the IRS, some checks happen in the background that help ensure that the transmission contains the required information, and that the information is correctly formatted. If the transmission contains an error, it’s status changes to Rejected.
Correct a rejected transmission
If the IRS finds an error in your transmission, on the IRIS Transmission page, the status of the transmission becomes Rejected. If that happens, use the Show error(s) link to open the Error Information page, where we can find out what to fix. After we correct the error, choose the Send Replacement action to resubmit the information. Repeat these steps until the status of the transmission becomes Accepted. To view the history of your attempts to submit, choose the Transmission History action.
Correct an accepted transmission
If we discover a mistake after the IRS has accepted your submission, for example, we submitted incorrect amounts for some vendors, we can correct the error and resubmit.
To correct a mistake and resubmit, follow these steps:
- Search for ‘IRIS Transmissions’, in Global Search and then choose the related link.
- Open the 1099 document that we want to correct and choose the Allow Correction action.
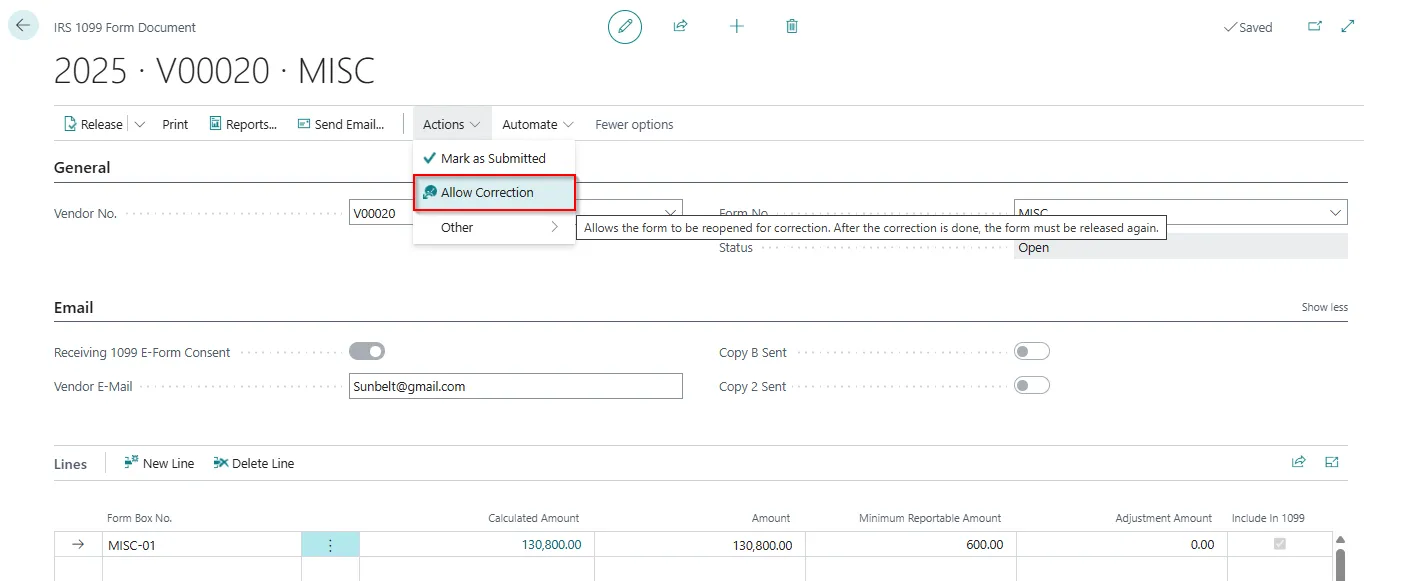
- Choose the Reopen action, make your correction, choose the Release action, and then close the page.
- On the IRIS Transmission page, the Needs Correction checkbox is selected for the lines we corrected.
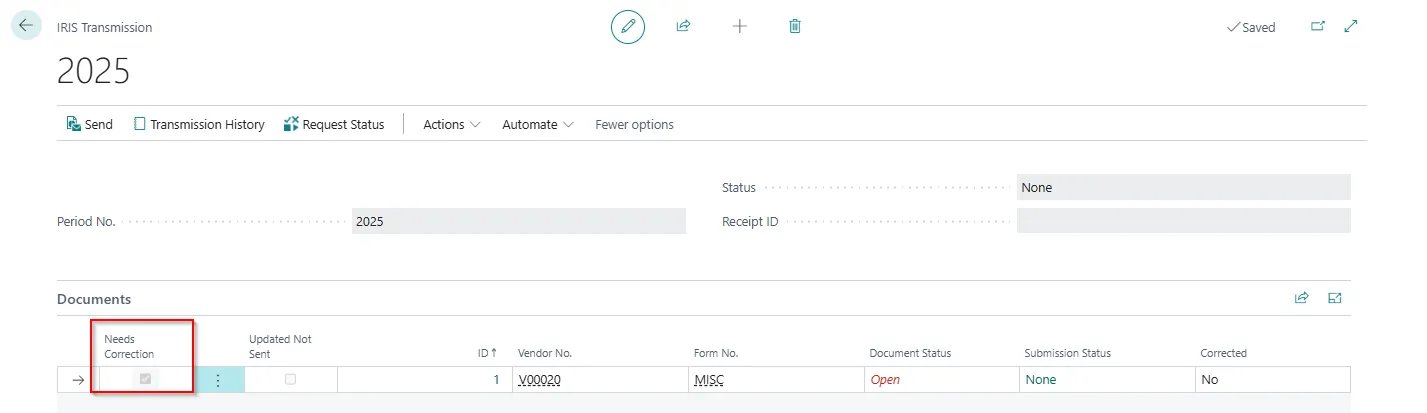
- To resubmit the lines, choose the Send Correction action. Business Central only sends the lines we corrected.
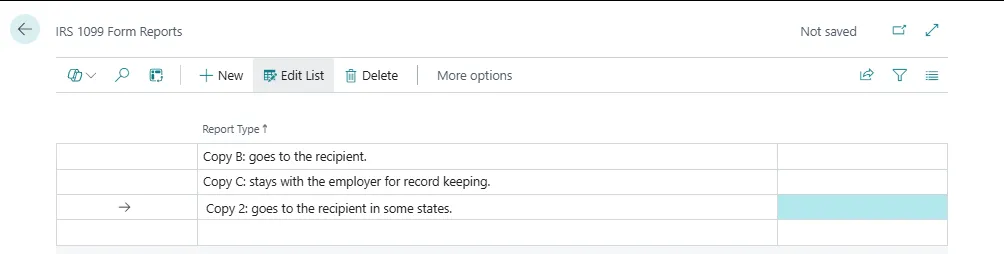
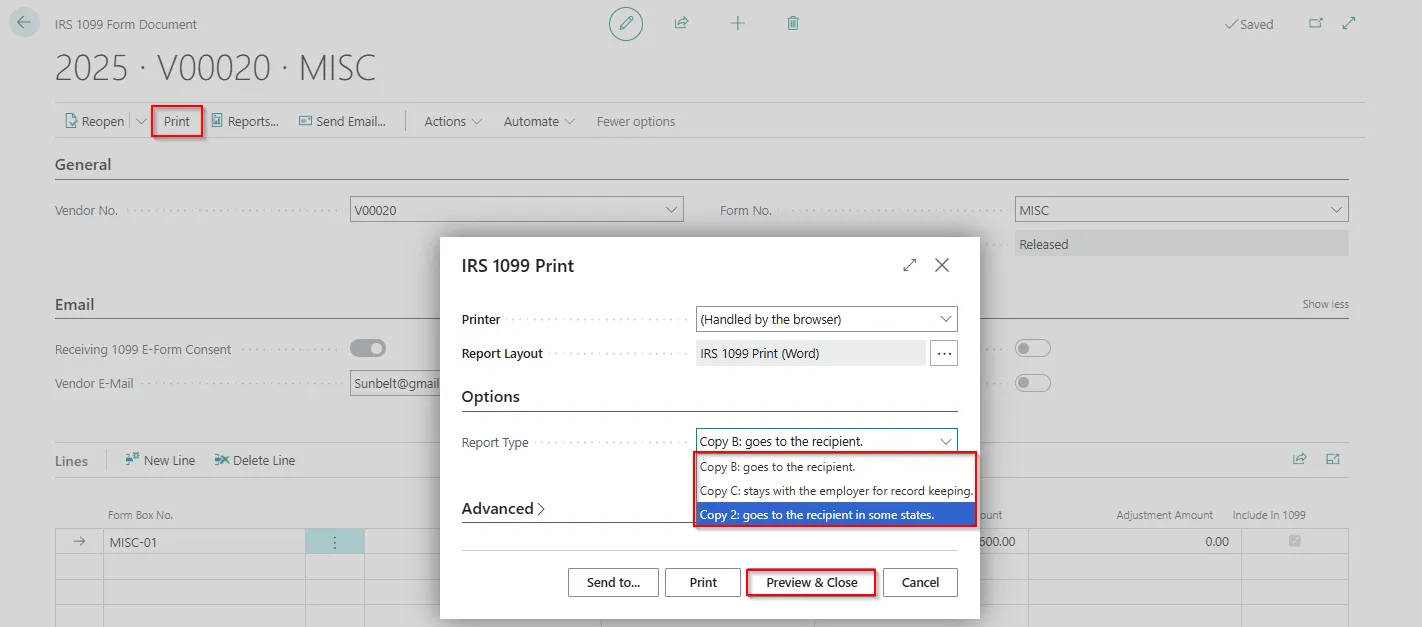
- Print the document
We can use the Print action to print the document. When We print the report, we can choose which copy to print. We have the following options:
– Copy B is for the vendor.
– Copy C is for the sender.
– Copy 2 is the second copy for the vendor.
Follow below steps to print:
Click on “Print” and request page will open, from the dropdown select the appropriate option and click on “Preview & Close” to view the form.
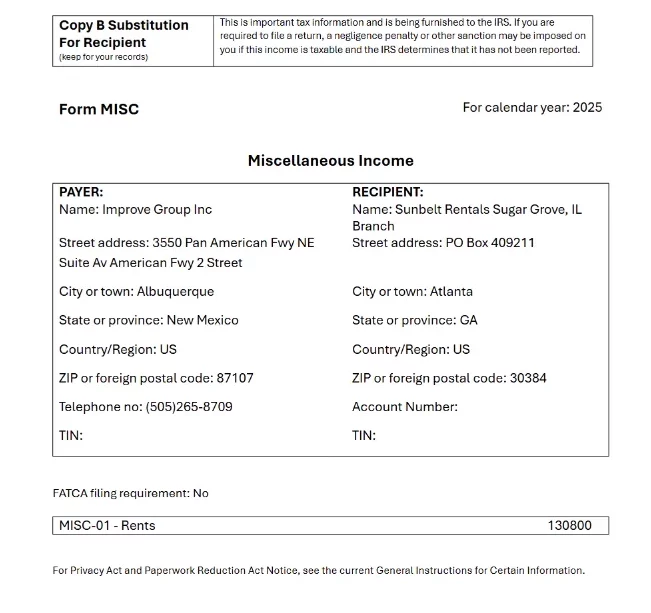
1099 Forms Report
1. Preview of the Form with Form details on Page 01 and Page 02 will consist various Form details.
2. If Users have set up Email Accounts in the system, then through of “Send Email”, they will be able to send Copy B and Copy 2 Once mail sent Copy B and Copy 2 Booleans on Form Document will be enabled.
Once the Form has been Printed or E-Mailed, the process is completed for IRS 1099 Forms.
Looking to configure or optimize 1099 reporting in Microsoft Dynamics 365 Business Central? Whether you’re setting up 1099s for the first time or preparing for year-end compliance, Madhda helps finance teams ensure accurate configuration, clean vendor data, and audit-ready reporting without manual work or risk. Our Business Central experts can review your current setup, identify gaps, and implement a reliable 1099 process tailored to your business. Explore our Business Central consulting services or contact Madhda to get expert support and stay compliant with confidence.