OAuth (Open Authorization) for Business Central is a security protocol used to authenticate and authorize third-party applications to access data and perform actions within the Business Central environment on behalf of users or organizations.
It enables secure and seamless integration between Business Central and external systems or services without exposing users’ credentials.
The Note: * This document is contains information on how to configure and how to connect with Business Central APIs & Web Service.
Why we need OAuth option?
1. Microsoft has stated a long time ago that Web Service Access Key (Basic Authentication) will not be supported. They have deprecated capability to access web services using Basic Auth for SaaS. So, now OAuth2 will be the only Authentication option available. This change will not affect on how Business Central connects to external applications.
2. For on-premises, web service key will work for the time being.
How to Configure/Use OAuth?
Step 1: Login into the Microsoft Azure Portal. [https://portal.azure.com/#home]
Step 2: Search/Navigate to App Registrations.

> Click on New Registration to create new app registration.

> Fill the mandatory information, Name, Account Type and click on Register.

> User will be able to see the important information after the application is successfully created.

Step 3: Choose API Permission and click on the add a permission button after that we need to select Business Central Application because we’re requesting Authorization for BC API permission.

> You can choose what permissions are required depending on your situation. In this case, we chose Application Permission.

> Now, Admin user will grant the permission by clicking Grant admin consent button.

Step 4: Navigate to the Certificates & Secrets to generate token, click on the New Client Secret. Add description and select expires and then click on Add.

> As you can see now, we have Token value. Configuration in azure portal is completed.

> The following detail you can get.
1) Application Client ID
2) Certificates & Secrets Value
3) Directory Tenant ID
Step 5: Now, we need to configure the Azure active directory Applications in Business Central environment.

> Create a new record and enter the Client ID, Description, and then assign permissions. Once you fill in all the information, then change the state to enabled.

> Note:

Step 6: Testing
> In our case we have used postman application to call web service using OAuth Token. Choose Authorization Type as OAuth 2.0 and select Request Headers in Add Authorization data to.
> Add Token Name and select Client Credentials in Grant Type.
> Access Token URL: https://login.microsoftonline.com/User Your Token/oauth2/v2.0/token
> Scope: https://api.businesscentral.dynamics.com/.default
> Client Authentication: Send client credentials in body.
> Now, Choose Get New Access Token.

> Now, click on User Token.
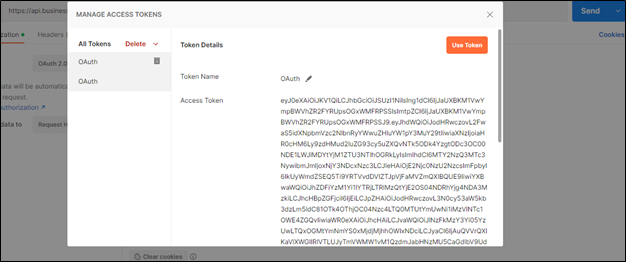
> As you can see in below image, we are able to connect with Business Central using OAuth Authentication option.

For more detailed Information:
Thank you for investing your time to read our blog! We’re passionate about sharing valuable insights to help you navigate the world of Business Central.
If you’re curious about how we can assist you in reaching your goals, don’t hesitate to get in touch. Our dedicated team is ready to provide support every step of the way.
Let’s turn your vision into reality together!