 You-tube


“Post Transaction Using Configuration Package” in Business Central refers to the process of automatically posting transactions to the system by importing a configuration package. This feature streamlines the posting of transactions by allowing users to define and import configuration packages that contain predefined settings for posting transactions.
Today we would like to discuss post-sales transactions using the configuration Package in business central. There is one feature in Business central which is called the Configuration Package. The configuration package can be used for post-sales Transactions.
Example:
If the user wants to mass block a group of vendors or put numerous invoices on hold. Instead of keying those changes one at a time, Then the user can import those modifications from Excel into Dynamics 365 Business Central using the configuration package.
There are the following steps Which help you to know in detail:
Step 1: Create configuration package for table sales header and sales line.
Open the Configuration Package as shown below:

Click on New and open Configuration Package Card.

The user needs to give the Code and Package Name of the Configuration Package Card.

Select the Sale header Table then the system will ask for Related Tables.

Then the user needs to select a related table.
Step 2: Select the required fields in each table.

Step 3: Set the parent table id against the Sales Line Table.

Step 4: Set Up the processing rules.
Select table 36 and click on the table Processing rules. As shown below screen.

Step 5: Set up action and processing filters.
In the Processing rule select Action as a “Ship”

Then Click on Processing Filters. As shown below

Then Configuration Package will be Open.

Give “Document type” in Field Name and “=1” Value in Field Filter.

Then close it. This screen will be visible.

Click on Close.
Step 6: Export the package in excel.
Click on Export to excel.

Then excel file will be downloaded into the system.
Step 7: Add the required data to the excel File.
Add data in the Sale header.

Add data in Sales Line.

Step 8: Import the data back into the Package.
After adding all the data Import this file into the system. Click on Import from Excel.

Then Click on Import.

Step 9: Apply the Package.

The system will ask for confirmation.

Then User can see data in Posted Sale Shipments.
If in Configuration Package the user has added a new customer, then the system will give chance to create a new customer.
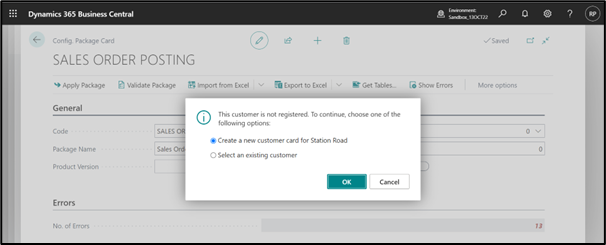
So, Users can add New Customer’s data on the Customer card Page.

Once data is imported successfully then the user can see the below message.

Step 10: Navigate to posted shipment to check the posted shipment.
Users can see all excel data Information is Posted Sales shipment and user can check Order No.

All orders and Posted sale shipments will be created in sequence.
Thank you for investing your time to read our blog! We’re passionate about sharing valuable insights to help you navigate the world of Business Central.
If you’re curious about how we can assist you in reaching your goals, don’t hesitate to get in touch. Our dedicated team is ready to provide support every step of the way.
Let’s turn your vision into reality together!