
Prepayment functionality in Dynamics 365 Business Central allows users to record and manage advance payments made by customers or vendors. This feature enables businesses to track and apply prepayments to future transactions, ensuring accurate accounting and financial management.
Implementing prepayment functionality in Microsoft Dynamics 365 Business Central (D365 BC) involves several steps and configurations. Here is an outline of the sections you might consider when setting up and using prepayment functionality:
General Posting Setup:
Click on Global Search and write General Posting Setup. As shown below screen.

Users need to select G/L account in Sale Prepayment account and Purch. Prepayment account.

The user needs to select a related G/L Account in Sale Prepayment Account and Purchase Prepayment Account. Suppose here we need to set up “Domestic” (General Business Posting Group) and “Retail” (General Product Posting Group).
Here we need to select the G/L account in Sale Prepayment Account as a “Customer prepayment VAT 0%” and the Purchase Prepayment Account as a “Vendor Prepayment VAT 0%”. As shown below:

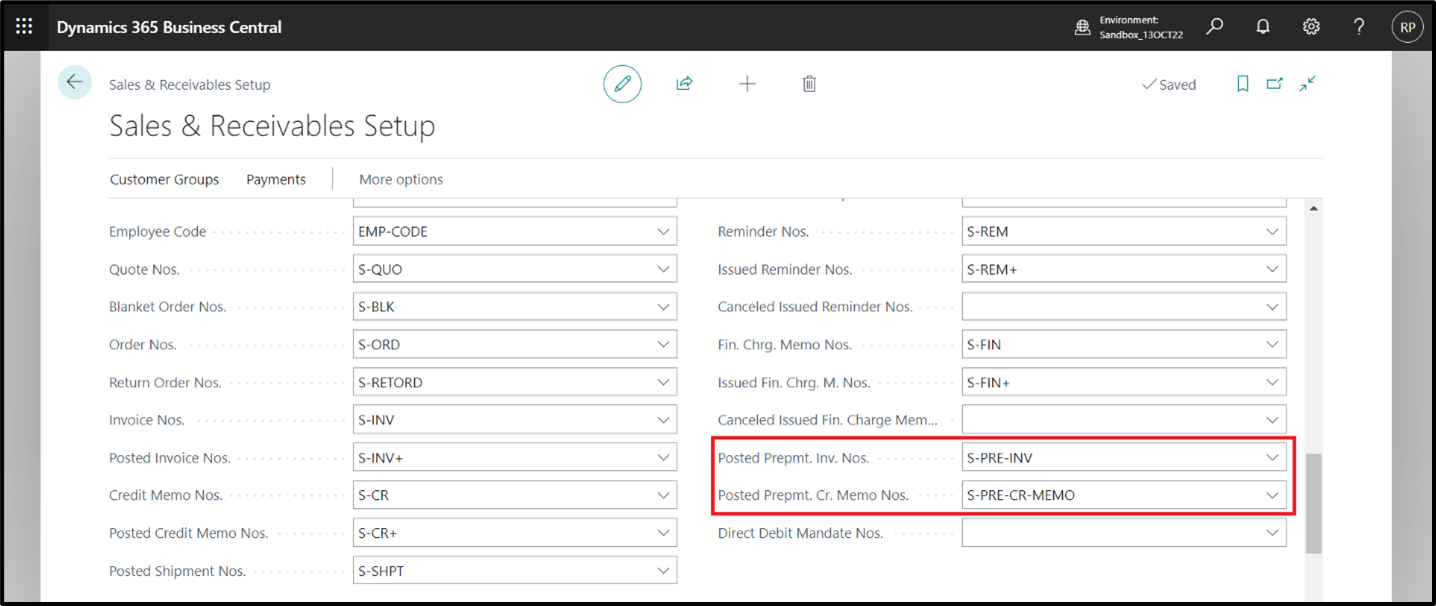
Sales and Receivables Setup:
Users need to do Sales & Receivables setup. So, click on global search and write sale & Receivables set up. As shown below:

Once a user clicks on it the Sale & Receivables page will open.

Users need to check Prepayment When posting in Sale & Receivables set up Enable to restrict Shipment/ Invoice for the order having unpaid prepayment (Payment not applied against prepayment invoice)
So, here user needs to set up Posted Premt. Inv. nos. and posted premt. Cr. Memo Nos. as shown below:
Item Card:
Users can also set up for Item. Open the item card on which users want to make set up.
Open the item card and go to related. Then sales and select Prepayment Percentages.

Then below screen will be visible.

So, in sale type system will give us 3 types of Options.
There are 3 options Customer, Customer Price Group and All Customer.

If a user wants to make a setup for a Customer, in that case, the user can select any specific customer and define the prepayment percentage.
If a user wants to make a setup for a Customer Price Group, in that case, the user can select several customers who can fall in the same price category.
If a user wants to make a setup for All Customers, then also it’s possible. So, whenever a user will select an Item that time prepayment calculation will be automatically done.
For Example, we have selected one customer and set its prepayment limit as a 20%. The customer number is 40000.

So here 20% Prepayment set here. When the Customer No. is 40000 and item is 1005.

Sales Order:
Now let’s make a sales order and select the same item (1005) and same customer (40000).
So, in the below screen, the user can see that the prepayment percentage will come automatically.

After that user needs to add here Quantity for sale.

Now, If wants to know more information about prepayment then they can see it in statics and also run a Prepayment test report.
For checking the statistics page user needs to click on related the order and statistics. As shown below:

On the statistic page, the prepayment amount will be visible in numbers in prepayment fast tab.

Users can also generate prepayment reports. By clicking on Action, Posting, Prepayment, and then Prepayment Test Report. As shown below screen:

User will get a prepayment report and need to select Print or preview whatever user wants as shown below:

Click on Preview so the user can be able to get report.

Once a user has seen all information about it then they can post it. By clicking on Post Prepayment Invoice…

Then the system will ask for confirmation.

Posted Prepayments:
User can also see posted prepayments against Sale Orders. By clicking on related, Prepayment and Prepayment Invoices.

User can see posted prepayment list here.

If a customer has not paid prepayment and the user will try to post that sale order than the system will give error. As shown below:

So here our sales & receivables setup check prepayment fields enable Boolean is working.
Bank Receipt Voucher:
Now user needs to make Prepayment.
Open Bank receipt voucher and select Document type as Payment, Account type as a customer and select customer in account no.

Click on the Home page and apply Entries then all entries will be visible against the customer and the user needs to select it and click on set applies to ID.

Then Applies to ID will be visible and click on Ok.

Then post Bank Receipt Voucher.

So in this way, the User can collect the prepayment of customer.
Thank you for investing your time to read our blog! We’re passionate about sharing valuable insights to help you navigate the world of Business Central.
If you’re curious about how we can assist you in reaching your goals, don’t hesitate to get in touch. Our dedicated team is ready to provide support every step of the way.
Let’s turn your vision into reality together!