 You-tube


To convert sales quotes to sales orders using Power Automate, create a flow triggered by new or updated quotes. Use Business Central connector to retrieve quote details, then map them to create a new sales order. Validate data and update quote status if needed, streamlining sales process and enhancing efficiency.
User can streamline your sales process, reduce manual data entry, and improve efficiency, ultimately enabling your sales team to focus on more strategic activities and providing better service to your customers.
Steps: Convert Sales Quotes to Sales Order Using Power Automate
1) For Do This, we need to create an API page. And add some fields to that API page.
And we need to use some properties like APIGroup, APIPublisher, and APIVersion because these properties are used in power automate.
So, Let’s create an API page.

We are converting Sales quotes to Sales Orders. So, add the sales header as a Source Table.
2) We are adding this attribute to this page.
[ServiceEnabled]
3) Now to convert quote to order we need to create one procedure. And in this procedure, We are using one code unit which is “Sales-Quote to Order”. So, Create one variable for that code unit. And add one more variable with the type

We need some properties from the Web service Action Context. Which are Set Object Type, Set Object Id, Set Result Code & Add Entity Key. So, Set these properties according to your requirement.
4) Now, publish your extension and open sales quotes, and check how many records are there.
as you can see, we have two records here on the sales quotes page. With quote no. 1004 & 1005.

5) Now, open power automates. Click on my flow. We are creating a new flow for converting quotes to orders. So, click on the new flow. And then select instant cloud flow from the given options. As you can see below image.

6) Now you get a new page. This page is for how to trigger this flow. So, select manually trigger flow from the given options. You can select a different flow as per your requirement. And then click on create. As per the below image.

7) When we click on create button, our flow is created, and you get a new page like this.
Click on the new step to add another step to this flow. As per the below image.

you can also see our selected type to trigger our flow.
8) Now you get a few options here for doing the operation. So, search for business central. You can get two options for business central. The first is for the cloud and the second one is for on-premises. we are using the cloud version. So, select the first one.
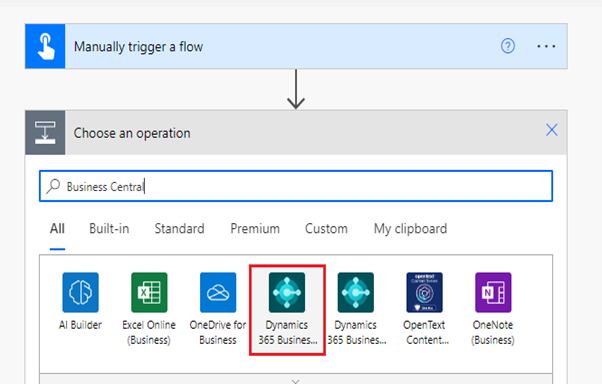
You can use the on-premises version also if you have reequipment for that.
9) Now you get a few options for actions and Currently, we need action. So, we are selecting run action(V3) from the given actions. You can also select different actions or triggers according to your requirement.

10) Now you get a new page to add some details. Like…
- Environment name,
- Company name,
- API category,
- Action name,
- Document Type,
- No.
So, add datils to that page and click on the save button.
As you can see below’s image.

11) When you click on save, your action was saved, and you get a notification about it. Now it’s time to test our flow. So, click on test As you can see below’s image.

12) After clicking on test action, we get a new page with options for how to test flow. There are two options here first manually, and second Select the first option which is manually. As you can see below image.

You can also select automatically.
After selecting options. Click on the test button to test our flow.
13) When you click on test, the system checks our environment datils. And if all datils are matched with your given datils. The system sets your flow and shows a green check. It means we are ready to go. Select continue button.

14) Now our flow is ready to run. Select run flow from the newly opened page.

15) After clicking on run flow, our flow was run, and got a new page that shows that our flow was run successfully. Now click on the done button.

16) Now open business central and check records on the sales quote page. Remember we have two records in the sales quote, with no. 1004 & 1005.
So, let’s check

See we have only one record of a sales quote with no. 1004. That means the second record is converted into a sales order.
17) Let’s check into the sales order page.

As you can see, on the sales order page we have one record with quote no. 1005. That means our flow was working properly.
Thank you for investing your time to read our blog! We’re passionate about sharing valuable insights to help you navigate the world of Business Central.
If you’re curious about how we can assist you in reaching your goals, don’t hesitate to get in touch. Our dedicated team is ready to provide support every step of the way.
Let’s turn your vision into reality together!